Showing posts with label food preservation. Show all posts

Sunday, July 6, 2014

Pork Belly Smack Down--Happy July 4th!

Happy, happy July 4th! I hope you all had a safe holiday. I'm currently rubbing refrigerated aloe all over myself while I try to rehabilitate my liver, so ours was clearly a good time.

But about the cooking competition: this holiday, my sister and I chose pork belly as our cook-to-the-death ingredient, much to my husband's delight. Up to this point, I'd never cooked pork belly (which is basically a big slab of bacon before it's cured and cut). I went to the Asian market the Wednesday before the lake trip to get a small portion of pork belly to experiment on (again to my husband's delight). It was a total, epic disaster. I tried a couple of different variations of marinating it and scoring the skin and then proceeded to cook them all beyond recognition (poor husband was not so delighted). Charred crackling, anyone? So I was good and truly nervous. I sat down and looked through all my cookbooks, trying to find a different method of preparation. Sadly, all my favorite cookbooks let me down. Is everyone but me just born knowing how to cook a damn pork belly?!?

I was also thinking about the balance of the overall dish. Everyone likes a good mix of creamy, crunchy, sweet, salty, and acidic in a composed dish. I wandered out on Wednesday to water my silly garden while I was thinking this over, and then I spied several green heirloom tomatoes. Aha! I knew then that I wanted to do a fried green tomato, but with a kick.
So I made up a brine of water, apple cider vinegar, rice wine, brown sugar, sea salt, peppercorns, red pepper flakes, cayenne pepper, mustard seeds, and fennel seeds. I put everything in a large saucepan and stirred it until the salt and brown sugar melted. I let it cool almost completely before I poured it over my sliced tomatoes so as to not cook them. They still needed to be fairly firm on Friday so I could bread and fry them. I had no idea if this whole pickled fried green tomato thing would work.
But it did! When the rest of the meal was nearly ready, I drained the tomatoes, coated them in flour, dipped them in milk, and then dredged them in a breadcrumb/cornmeal/flour combination before frying them in clarified butter.

But back to the pork belly. After Wednesday's abysmal failure, I had no clue what to do. Thursday rolled around, and it was time to get my groceries, get packed, and head to the lake. I still had no clue how to fix (don't laugh at my vernacular here) a good pork belly! The girl child and I went to Hirsch's Meat Market (a great local butcher shop near Parker and Alma in Plano, if you're a Dallas-ite), along with every other person in DFW who was looking to stock up on meat for the holiday. However, while I stood around for half an hour, waiting for my number to be called, I saw it! The perfect glaze (confirmed by the gentleman in front of me who purchased 25 pounds of ribs, three pounds of liver, and six pounds of tongue. I decided he was a legit source).
Right on. We were in business. So here's how the belly went down. I didn't score the tough skin layered over the fat because that just made a mess, but I did puncture it several times with a sharp knife after I seasoned it with salt and pepper so some of the fat could render out. I heated the biggest pan I could find (as I had a five-pound slab of pork belly) to about medium high, and hefted it, skin side down, into the hot pan to sear and render. Into another deep pan (oven safe with a lid), I poured one quart of chicken stock and added some pepper as well as a handful of fresh thyme and rosemary from the herb garden. While the broth warmed on a medium-low heat, I pulled off the belly when it was dark golden brown. With a great show of strength (see me flexing as I had to use two giant grill forks to move this ridiculous piece of meat?), I wrestled the giant belly into the broth, skin side up, and put it in a 325 degree oven to cook for a little over an hour. When both the fat and meat below were nice and soft, I glazed the skin side with my glaze and took it out to the grill for a last good sear to crisp up the skin. (You could also do this under the broiler). Let it rest for about 10 minutes or so before serving.
While the pork belly was cooking, I made some cheesy mashed potatoes. Nothing fancy. I just peeled and cut five baking potatoes, put them in a big pot of cold water, and brought it to a gentle boil until I could easily pierce them with a fork. Drain and put them back over the heat, shaking the pot, to burn off any excess water that will make your potatoes watery. I added about 4 T. of butter, 1T of sea salt, 2/3 cup heavy cream, 1/3 cup milk, and 1/2 cup chunked up cheddar cheese. As I added these ingredients, I tasted a lot to see if I liked the level of creamy/salty/cheesy. Keep in mind that the pork belly and tomato will have an element of salt as well, so don't over salt.

To really appreciate the final product, you had to get a bite with potatoes, pork belly, and tomato all together. It actually worked out really well, much my shock.

My fabulous competitor, my sister, made pulled pork belly tacos (with an agave nectar glaze) served with grilled pineapple and poblano peppers. YUM! Her dish was way prettier than mine.
By a very narrow margin, I won our fourth of July competition, which was a delightful mess. We (my spouse, sister and BIL, mom, daughter, and about ten friends) all spent the day at the lake (on the beach, not the boat. I hate taking the boat out on holiday weekends) eating bratwursts, drinking beer, and floating. We trooped into the house crazy hungry, sunburnt to a crisp, with sand in all our crevices, and proceeded to cook for two hours. Madness. But fun madness. I'm very grateful to live in a place where I can spend the day on the water with friends and family. Happy birthday, America! Or, as my friend Bloody Gaga says, 'Murica. And she says it while wearing a trucker hat with 'Murica airbrushed on it, gold hot pants, and while embracing an Elvis impersonator who smells of Axe, but that is another story....

Recipes follow the break here...

Thursday, March 13, 2014

The Economical Kitchen--Strawberries and Muffins to Make You Swoon

The strawberries are so pretty at the store right now; I cannot resist them. (One thing I try to always buy organic is strawberries. They are one of the most heavily chemical-laden fruit available. See this link to an NPR story about California strawberries.) However, I wound up with a surplus of fruit last week, and my girl-child was in a rabid banana phase, so I wanted to preserve my strawberries. I love, love, love dehydrated strawberries. The dehydration process makes their tart/sweet flavor even more pronounced. So I cut them into even pieces and dehydrated them. Depending on how thick you cut your slices, they can dehydrate quickly, so keep an eye on them. Chunkier slices will make a more gummy-bear sort of consistency, and very thin slices will become almost like paper. I like a happy medium. When they were done, I bagged them and put them in the freezer. They can last for up to a year this way.
But they didn't even last a week in the freezer. I got hungry for Chunky Monkey Muffins. I started making these a long time ago, but haven't made them in a while. When I came up with this recipe, I started with the Oat Bran Muffin recipe from my pink gingham Betty Crocker cookbook. For the record, let's go ahead and clear the air about muffins. They're cake. Period. Just because we put oatmeal and fruit in them and call them breakfast does not make them any less cake-y. Check out the sugar content on that Starbuck's blueberry crumble muffin. I dare you. 

I, however, like cake for breakfast. But I don't want to feel crappy about it. So I worked out a recipe for really toothsome, chunky muffins with low sugar that can easily be made vegan.  
For the Chunky Monkey, I mix 3/4 cup instant oats (if you want to use steel cut or old-fashioned, just soak them in hot water until they're softened up a bit before you proceed) and 1/4 cup hemp hearts with 3/4 cup whole wheat flour and 1/4 cup all-purpose flour. Throw in 1/4 t. of salt. To the dry mix, I add 2 t. baking powder, 1/2 t. baking soda, and two packets of Stevia. You can sub in any sweetener you like or you can add extra honey below. Mix well.  
Here's the chunky part. I added about 1/4 cup blueberries because they needed to be eaten, 3/4 cup dried strawberries, 1/4 cup shredded coconut, and about 1/3 cup walnuts.At this point, my muffins are really just fruit and nuts held together by a little muffin.
In a small bowl, I combined 1/2 cup buttermilk, 2T. oil, 1/4 cup honey (you can also use maple syrup or agave nectar or whatever you're into), 1 single serving container of no sugar added applesauce (about 4 oz.), an egg, and 1 t. vanilla. Combine gently until all the flour is moistened. Don't overmix, but get it all wet. This will be a pretty thick batter.
Grease your muffin tin. This recipe makes enough for 9 medium-sized muffins. I fill the cups all the way up. I always fill the remaining cups with water to add moisture to the baking environment. Bake at 350 for about 14-15 minutes. You don't want to overdo these, as the oatmeal and whole-wheat flour will dry out quickly. However, if you catch them just at the right moment (when the knife tip comes out with just a smidge of batter on it), they're warm and soft and full of texture. They're not pretty, but they taste great and aren't too shabby for you. I have also made these with rice milk instead of buttermilk and Ener-G egg replacement for a lower calorie, vegan version. If you go this route, add a bit more applesauce and oil for moisture. I love to use organic coconut or grapeseed oil in these.
These muffins are rad because they're so versatile. Add dried bananas, slivered almonds, pumpkin or chia seeds, or my favorite, dried cherries. The recipe is after the break!

Tuesday, December 17, 2013

The Economical Kitchen--Don't Throw Anything Away!!

The grading. My goodness, the grading. I can't even talk about it right now. Anyway, a little over a week ago, I received a fantastic Bountiful Basket. Amazing. I had added the $10 tropical fruit pack as well. I came home with three grocery bags full of produce for $28. Bananas, pumelos, apples, lemons, three colors of carrots, broccoli, etc...came in the regular part, and I got two vanilla beans, six mangoes, several small key limes, a pineapple, kiwis, a coconut, ginger, and a bunch of mint in the tropical add-on.

Of course, as soon as I got this fabulous bounty, my life at work went nuts and most of this languished in the crisper. I've been pretty guilt ridden but loving the kiwi and mango at least during the week. Anyway, today I got some free time, so I decided it was time to use up as much of this as I could before it went bad. Nothing aggravates me as much as pitching food in the trash. I never feel as crappy about being a middle-class American as when I throw away food because it went bad. Anyway, so I just did lots of little odds and ends with things to preserve as much as I could today. Now, none of this is revolutionary, but I think it's handy to have in one place, especially if any of you haven't thought about preservation this way.

The sad bananas were peeled, bagged, and frozen for future banana bread and smoothies. (I KNOW there's a Vitamix under the tree. I'm willing it to be so by stocking fruit for smoothies in the freezer.)

Next, I had this bag of lovely mint. My little one and I love, love mint in our hot tea. You don't understand about the significance of beverages in my family. My husband has often said that he could never lose me, my mother, or my sister because all he needs to do is follow the trail of cups. At any given time, each of us has about three cups of something going. My sister sent me a snapshot of her desk at work the other day, and I swear there were about eight cups/mugs pictured. My daughter is following in this fine tradition, and she especially loves minty hot tea when she's feeling under the weather.
So I got out an airtight container and just layered sugar and mint leaves (that I had slightly bruised in my hands) several times over until I had enough.
Mint-infused sugar. 
Now we'll have minty sugar for the foreseeable future. This can go in jams, jellies, desserts, drinks, anything! But I still had a lot of mint left.
Mint Extract
So, I decided to make some mint extract. I sterilized a jar, popped in a stick of peppermint candy and bruised mint leaves, covered it all with vodka, and hurray! After a few weeks in the pantry, I'll have gorgeous mint extract. Then I decided to do the same thing with my vanilla beans. I really wanted to cook with them, but it just wasn't happening. I go through a lot of vanilla extract though, so I decided to make some. I slit the vanilla beans down the middle and covered them with vodka. We'll see how this is in about five weeks. If I get more, I'll cover them with rum and see how the two compare.
Vanilla extract.
I had SO MUCH FRUIT! When I got my basket home, I had broken down the pineapple and stored it. One day last week, I had made kiwi-apple juice for jelly and frozen it when I ran out of time to finish. About eight days later, it was do or die for the pineapple and mango. Jellies and jams are really not very hard to make, and they're a great vehicle for fruits that don't do well in the freezer. If you don't want to go to the trouble of sterilizing jars and processing them in a water bath, you can buy Ball brand jars meant especially for freezer jam and go that route. I don't have the freezer space, and I like having a stock of interesting treats handy for gifts and special occasions.
So here's the stove top: top right is Five-Spice Pineapple jam simmering away, bottom right is the kiwi-apple juice reducing, bottom left is mango-lime jam, and top left is boiling water to sterilize jars.
Start of Five-Spice Pineapple Jam. It's stupid easy. 
About a month ago, I made a simple syrup and combined it with shredded cranberries and vodka (are you seeing a pattern here?) to distill into cranberry liquor. It was ready, so I strained out the cranberry bits and bottled the liquor. The cranberry bits went into a sauce pot with sugar to cook off the booze. It's now a really tasty cranberry relish.
Here's the end result of my jams, jelly, and holiday hooch. I feel good that I didn't let food go to waste, and now I have some fun, special things to share with friends and family for Christmas next week!

I also still had three bell peppers and four tomatoes about to crap out. So I chopped them into large pieces, drizzled them with oil, and roasted them under the broiler until they blackened. When they cooled, I put them in freezer bags and froze them. I can use them in any number of tomato-based sauces coming soon!

The moral of the story? Always have vodka on hand.

I also raided the veggie drawer and made soup from carrots, sweet potato, onion, and garlic. Soups are the best vehicle for veggies destined to become mush otherwise.  I'll post about it soon!

What do you do when the contents of your fridge are about to go bad?


Tuesday, December 3, 2013

The Economical Kitchen-Bountiful Baskets Edition

Yesterday, a friend of mine shared a link to an article that identified ten American foods that other countries have prohibited because much of our food, as we know, is total junk. Of course, everything we read on the Internet has to be taken with a grain of salt; however, we all know that the food situation in America is problematic on a myriad of levels. I've been thinking on the issue of sustainability, environmental responsibility, and most importantly, the health of friends and family due to food we eat.
The scene of the crime in a local elementary school parking lot.
So glory be! I finally got online at the right time to buy a Bountiful Basket! I tried a couple of times before my dissertation ate my life to get one, but the attempts were halfhearted at best. What's a bountiful basket? This is a co-op run by volunteers. Baskets cost $15 ($25 for organic) and you can add on other options from the website (40 lbs of honey crisp apples, anyone?). You will also pay a one-time fee of $3.00 for your first basket, and a small processing fee ($1.50-$3.50 ) each time (this may vary depending on what part of the country you're in). The fees are so that every penny of your $15 can go towards food. The point is Bountiful Baskets is three-fold: 1) To give people an opportunity to buy wholesale fruit and veggies, allowing folks to eat healthier for less money, 2) To include local and thus more environmentally responsible produce as the bulk of the food offering, and 3) To foster a sense of community and understanding where our food comes from.
It's a terribly dreary day (which I love), so I'm sorry the pictures aren't cheerier.
It's a pretty cool deal. You can go to their website (see the above link) to get the scoop, but basically, they offer baskets on Saturdays on a rotating basis. There are A groups and B groups that flip-flop every weekend (this weekend I'm going to an A group. I could do that every two weeks, or I could do a B group the weekend after if I wanted a basket every week). Check the website for locations (this co-op is all over the nation, btw, so check it out even if you're not in the Dallas area). I'm lucky enough that there is a pick-up site about five minutes from my front door. Basket buying begins on Mondays at noon. Some of the sites sell out quickly, which is why I missed getting a basket in the past.

This week, however, I was determined. So there I was at work, frantically grading papers with the BB website up on my laptop. I had my alarm set for 11:58 so I wouldn't miss the opening, but I also had a conference call to dial into at noon. Oh, THE PRESSURE. Anyway, it was fine. The leader for the call was five minutes late and the baskets did not sell out in the thirty seconds it took my to get my s@#$ together.

I was so excited to get my baskets (they sort everyone's produce into laundry baskets, but you have to bring your own baskets/bags to take things home in). And look at my treasures!
I think this is a great deal for $15! Six apples, 7 bananas, a cantaloupe, a big bag of grapes, 3 small potatoes, one large bag of Yukon potatoes, 3 huge onions, 3 cucumbers, one bunch lettuce, one big bundle of celery, a bag of carrots, and two giant sweet potatoes. It's kind of an adventure because you don't know what you're going to get.

I know right off that I wouldn't eat the cantaloupe before it went bad, so I found a recipe for Vanilla Cantaloupe Jam. Vanilla and cantaloupe together are a revelation! Who knew?
My little bountiful basket cantaloupe became a lovely pot of jam, which became this:
There was a bit more, but in all honesty, I ate it. With gusto. 
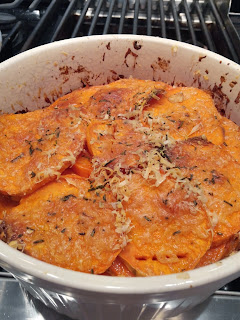
My sweet potatoes became the Rosemary Sweet Potato Gratin I linked to a few weeks ago. It was wonderful.

So here's my review: the people were really nice and I got a ton of produce that was in excellent condition. I like not having to pay the grocery store for being a middle man or taking home more plastic sacks. I did not love standing around for 25 minutes in the freezing cold waiting to get my basket, but I thought that overall, this is a worthwhile effort, particularly if your family is on a tight grocery budget but you really want to eat more fruits and veggies.


Saturday, November 2, 2013

The Economical Kitchen-Pumpkin Edition

Happy November from Colonel Brandon!
It's two days after Halloween, and I bet your children's magnum opus pumpkin carvings are sitting on your front porch, about five days out from being a disgusting puddle of mush. Yup, me too. Plus one that didn't get carved. So it's time for another installment of "The Economical Kitchen-Pumpkin Edition." Turning that pumpkin into about 15 cups of lovely pumpkin puree is really easy. However, it is a bit time consuming. One of my favorite bloggers, Ben Starr, who was on Masterchef Season 2, and is such a freaking cutie, has instructions here.

I opted to cook my halved pumpkin in the oven at 350 degrees while I puttered around and finally made Earl Grey jelly (tomorrow! I promise I will post about it tomorrow!). As per Ben's instructions, when it was cooked, I scooped all the yuck out of the middle. I didn't want to put the pumpkin in my food processor because it is an unholy pain in my ass to clean. So I did one half of the pumpkin at a time, scooping it into a pot so I could use my immersion blender to puree. (My actual blender died recently in a tragic Srirancha Hummus debacle about a month ago. The hummus was so good, it was almost worth it, and now I can cast sad eyes at every Vitamix I see and hope my hubby gets the message before Christmas.) Anyway, I love my little immersion blender.
It made short work of both pots of pumpkin puree. Here's where I part ways with Ben. I just couldn't deal with the mess of the whole towel process to remove the excess water. So I spread my puree into two cookie sheets with inch-high sides on them,
and popped them back in the 350 degree oven until most of the water evaporated. Now, what to do with all this pumpkin? I saved out about three cups to make a variation of Ben's Curried Pumpkin Soup, but that left about twelve cups still to store. I measured the puree out into 2-cup servings. I know, I suck for using plastic baggies, but I just don't have room in the freezer for bulky storage containers. I'm trying to make up for it elsewhere in my kitchen! To prevent a total mess in getting your puree into baggies, I recommend that you put a baggie into a bowl and use a wide-mouth funnel for pouring (I use my canning funnel).
It works great. I did not picture the first bag I attempted with no tools. Let's just say that Colonel was really happy licking up the pumpkin puree that went all over the floor. But, in the end, I came out with a very respectable bunch of pumpkin to use that will last me through the holiday season!

Don't forget to label your baggies before you pour product in them! Home cooking is all fun and games until you wind up with a bunch of mystery crap in your freezer. What am I going to do with all this pumpkin, you might ask? I thought I would troll around and provide you with links to the recipes I'm dying to try. It may wind up sounding a bit like Forrest Gump, however.

This Pumpkin Ice Cream looks amazing, as do Pumpkin Whoopie Pies.

I found an entire blog dedicated to pumpkin, complete with dog treats! Find The Pumpkinista here.

Now go get those terrible-looking pumpkins off your porches, cut off the carved part, and cook them up! Now you can make pumpkin goodies all season long without using the processed, canned stuff. What are your favorite pumpkin recipes?

UPDATE: This puree makes the best pumpkin pies in the world. Don't be afraid to sub this in for the canned.


Tuesday, October 29, 2013

The Economical Kitchen


 So, economy. Something I've not really been great at in the past, but as I've gotten older, not only am I more aware of my family's finances, I also spend a lot of time thinking about how to lessen our environmental footprint. This week, I've been thinking about how to stretch what I buy and let less go to waste. Maybe this is a result of all the guilt I have over the trees that died so my dissertation could be born. Who knows, but I just don't want to be eighty, and look back only to think, "Wow. I sucked at life."

It seems that economy is all about the little things. So I started small. When I made last week's tomato jam, the recipe called for a little bit of fresh grated ginger. I bought a small knob and used about a third of it. I hated to put the other 2/3 back to moulder away in the veggie drawer, so I grated the rest up and put it in an ice cube tray to freeze. The next day, I had two tablespoon-ish servings of ginger to use in a future recipe! I know, I know, this is basic kitchen economy, but for a recent graduate, having time for this kind of thing is pretty revolutionary.
I was careful to label and date the baggie. I'm working on building a collection of various size freezer-safe jars so I can avoid using the plastic bags.

While we were at the lake house this weekend for the great Salad Challenge of 2013, my dad called and asked if I would trim the herb garden a bit. The man has a fabulous herb garden. No really; it makes me swoon a little bit. Here's the corner with sage, oregano, thyme, and basil. His enormous rosemary bushes are not pictured.

So I cut a giant amount of herbs off these gorgeous bushes. I always take some home to use and to feed the bunnies for treats, but I looked at these two garbage bags worth of trimmings and decided it would be criminal to throw it away. So, much to my husband's chagrin, I hauled home trashbags full of herbs. But what to do with them?

About half this basil was run through the food processor with some olive oil.

It got the same ice-cube tray treatment as the ginger and then plopped into a large jar in the freezer. "Basil for the world" is my new motto. But I still had a ton of herbs left. So I (sort of unwisely, as I needed to head to work in about two hours) embarked on another save-the-herbs campaign.

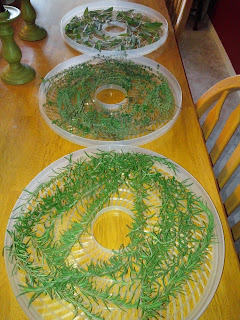
I loaded another bunch of rosemary, thyme, and sage into my handy Oster food dehydrator. It really dried out pretty fast (about an hour and 45 minutes, which was delightful, but I was standing in my kitchen, playing with crunchy herbs when I desperately needed to be finding something business casual to climb into).
I refilled all my existing herb jars and had this leftover (I know. I said I was working toward a plastic-free environment. I really am.) I still have about 2/3 of the herbs I brought home left over, but I'm off tomorrow and going to dry some more and try to devise some new methods of preservation. I'm thinking some blackberry-thyme jam or jelly might be in order.

Someday, I hope to have some readers. Until then, I'll just throw out questions into the ether. What do you do with leftover veggies and herbs?

Friday, October 25, 2013

Puking Pumpkins

About four years ago, my parents bought a house on a local lake that has become a favorite getaway and meeting place for my parents, my sister, our spouses, my daughter, and our collective three dogs and three bunny rabbits. A couple of years ago, my sister, Kari Ann, and I decided on Labor Day weekend that we would have a Bread Pudding Throw Down, which resulted in much hilarity, smack-talking, and delicious results. We have since then had a Shut-Your-Pie-Hole Pie Contest, and a Punkin' Chunkin' contest, among others on every holiday weekend.

Which brings us to the puking pumpkins.

Last year, I posted this on my sister's Facebook page as the introduction to our time-honored sibling smack-talking that both tickles and delights our friends and family.
We went on to make a pumpkin flan (Kari Ann) and a pumpkin souffle with a pomegranate reduction (mine). Winner undecided. That was early in the days of our contests, when the family was still too nice to declare a winner.

This holiday weekend (we always meet up around Halloween to have a party for my daughter), I let my blessed sibling choose the theme for our throw down, and she chose SALAD. Of all the culinary delights in the world, salad. To which I responded:
The puking pumpkin motif seems to be the mascot for our autumn hijinks.

I'm not a huge lover of the salad, I must admit. However, I'm planning to use the tomato jam I made yesterday as my secret weapon to help me cheat a bit on this salad competition. I will report back with pictures and results of the (insert deep, heaving sigh) salad contest. It may well be epic.

By the way, if you've never checked out the subculture that is Pumpkin Chunkin', please follow the link. It's hysterical.